Friday, December 31, 2021

A Project Named Clancy - XI. Finishing the Hull


It can be a struggle to select a paint color for a boat.  I like to start with a trip to the marine store to scope the available options.  Next, I use the computer to try out a couple of these options on the boat.   I've tried a couple different pieces of software in the past, but have to admit that I keep coming back to MS Paint...


For Clancy, I selected Interlux Brightsides Sea Green for the topsides, with a white bottom.  The decks would be varnished.

The Clancy plans do not show a waterline for the boat.  This led to the rather unconventional step of launching to boat to find and mark its real waterline.  The boat was dropped into the water for the first time, and the author's wife climbed in to provide an operational level of ballast.  A series of pencil marks were made around the hull at the point the water met the hull (i.e. the very definition of a waterline).  When I got the boat back to the shop, the boat was leveled levelled to its marked waterline, and then a laser level was used waterline It was quite a bit more work than simply striking a line based on plans, but on the bright side, there is little doubt as to whether the boat will float on her lines.


With the waterline marked, the hull underwent final touch up sanding and cleaning, and the bottom was masked off.  My typical method is to apply masking tape to within about 1/4 inch of the line, and then use 1/2 inch 3M Fineline tape to tape right up to the line itself (the Fineline tape overlaps the masking tape slightly this way).  Fineline is pricey stuff, but I think is worth the investment: unlike masking tape, it gives you very good control over where your masking line is, even around curvy shapes and I've never had any problems with paint bleeding through it.


Next comes primer.  When building a boat, you become used to seeing the wood of the hull.  It always feels a little strange when you first cover it with paint. 


A total of two coats of primer are applied, with each coat sanded until smooth and translucent.  


This has to be done by hand because power sanding generates too much heat and will just get gummed up.  Fortunately, the Interlux primer sands very easily.


Three coats of paint go on over the primer.


This process is repeated for the sides.  Since this boat is destined to be green, a gray primer is used.


The boat actually looks pretty sharp in gray.


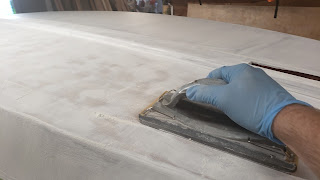
The primer is sanded...


...and the hull is washed with 333 solvent.


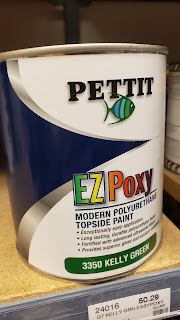
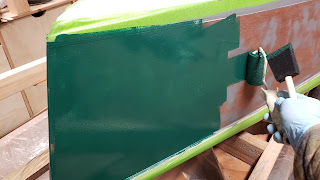
This is followed by the green topside paint, applied using the roll and tip method.


I ended up applying four coats of topside paint.


Once the paint is all on, you get the reward of peeling off the tape and seeing the final look of the hull.


The hull gets flipped over and is ready for final sanding, cleanup and varnish.  Inside the cockpit, three coats of gloss varnish are applied to build depth, followed by a single coat of satin to knock down the gloss in this high traffic area.


The deck itself is destined to be finished with a high gloss.


You get an idea of the final look after the first few coats go on.


I ran into a terribly annoying problem.  My garage has become an inexplicably dusty place.  Despite diligently sweeping dusting and vacuuming everything I could touch prior to varnishing, the dust still settled, creating something more akin to a nonskid surface than the smooth, glossy finish I was shooting for.


I tried everything I could think of.  I sanded down the boat, cleaned the garage again and tried again, with little difference in the result.  I bought a Wen shop air filter, which may have helped, but not enough.  I built a small tent over the boat.  This was closer still, but still unsatisfactory -- why that didn't work is beyond me!  Finally, I took a risk and pulled the boat outside to varnish it.  This finally produced a satisfactory result.


Saturday, December 25, 2021

A Project Named Clancy - X. The Sail


The Clancy support network that Bob Pickett set up is long since gone, so you are on your own when sourcing parts like hardware or sails.  The plans (both the New Yankee Workshop version and those in the book) do provide a sail plan with enough information that a sailmaker could make a Clancy sail.  Rather than so this, I decided to try my hand at making my own using a kit from Sailrite. 

The kit includes pre-cut panels that are sewn together to form the sail.  It also includes most of the other things you will need, including the thread, seamstick tape, battens and grommets.  You'll need to supply the sewing machine (I bought a heavy-duty Singer for this project), scissors/cutting instruments, and, most annoyingly, a grommet die tool (available from Sailrite).  The kit includes a good set of directions that are sufficient to guide anyone with basic sewing skills through the process.  I had not sewed before, but figured that a sewing machine is just another power tool, so how hard could it be?  I learned that there is some technique involved, but overall the Sailrite kit can be successfully turned into a sail by even a complete novice.


I used a Singer 4452 sewing machine with a 110/18 needle and found it to be a satisfactory setup.  The machine was working fairly hard when sewing the thick corner patches, but managed to get through it. Because of the size of the sail, I had to set up the machine on the floor of the living room (a.k.a. the sail loft), else managing the huge panels would have been impossible.  The ergonomics of sitting on the floor, feeding great rolls of canvas through a sewing machine while pushing the foot pedal are challenging and I found that enlisting a helper made a big difference.  As I had never sewed before, before doing anything serious, I used some of the spare sailcloth included in the kit to practice and to set the top tension on the machine to get good stitches.  

The first step in building the sail is to cut out the batten pockets and sew them to the sail panels.  It is easiest to do this before sewing the panels of the sail together, so that you do not have to wrangle massive swaths of canvas through the sewing machine.  Nearly everything in the kit is pre-cut, but the batten pockets are for some reason the exception.  Dimensions are provided, and the pockets can be cut in short order.

The edges of the pockets are hemmed (I had to learn about hemming and seam allowances before that sentence made sense):


This is repeated for all three batten pockets.  


An elastic band is sewn on to the forward end of each pocket.  The batten will eventually end up sliding into the pocket and against the elastic band, which will help hold it in the pocket.  The other end of the elastic band is sewn to the sail in a premarked location.  This was a bit of a pain to accomplish since you have to fight the sail panel and pocket and the elastic at the same time.  After this, seamstick (double sided) tape is used to place the batten pocket on the sail (the positions are marked on the sail)... 


...and all but the aft 2" of the batten are sewn down.  The last 2" get sewn after the leach of the sail is finished.


Next, the panels of the sail are sewn together.  This is a remarkably straightforward process.  The upper edge of each sail panel has a line printed on it.  The lower edge of the panel above is lined up with this.


Seamstick tape is then applied...


 and the panels are taped together:


They seam is then run through the sewing machine twice to receive two rows of zigzag stitches.


After stitching together a few panels, it is starting to look like a sail!


The process is repeated until all the panels have been added.


Having a large "sail loft" is important.  The living room/dining room is the largest open space in the house, and generally fit the bill.


The corners of the sail are reinforced with thick patches, assembled from multiple layers of sail cloth.  These are assembled with seamstick...

...before being sewn to the sail. These are the true test of the adequacy of your sewing machine.


The leach and foot of the sail are then hemmed, and the remaining length of the batten pockets are sewn down.  The original plans call for a sleeve to be sown onto the luff, into which the mast slipped when rigging (a la a Laser).  Since I am using a square-section spruce mast instead of the aluminum tube, I had to modify the luff.  After consulting with the sailmaker at Sailrite, I finished the luff with some sail tape and a bolt rope sewn in.  I then added small eyes every ~18", to which I shackled on external track slides.  The mast will get and external t-track sail track, and the sail will be hoisted via a halyard, and the downhaul will be eliminated.

The final step in constructing the sail is to install the grommets at the corners of the sail.  A hole is cut in the sail (or can be punched using a cutter available from Sailrite -- this makes the job easier and neater, but they are pricey and not absolutely required).  One half of the grommet is placed into the hole, the other half is place on the other side of the sail, everything in placed into the die (available from Sailrite) and pressed together with mighty whacks from a mallet.


Saturday, December 18, 2021

A Project Named Clancy - IX. Daggerboard and Rudder

The rudder and daggerboard make good side projects while working on the hull.   

The rudder is a kick up design, with the blade of the rudder able to pivot up when in shallow water or beaching the boat.  The plans call for the blade to be made of sheet aluminum.  I had plenty of spare 1/2" plywood around and used that instead.  

The rudder blade gets cut out with a jigsaw.


To give the rudder an "airfoil" shape, a 1/4" roundover bit is used at leading edge of the rudder, while a power plane is used to give the trailing edge a long, gradual taper. 

For the upper half of the rudder, two rudder cheeks are cut out -- to achieve symmetry, two pieces of plywood can be stacked and both cheeks cut at the same time.  The inside faces are coated with epoxy and sanded smooth.

A 1/2" piece of plywood is cut into a spacer to go between the two cheeks (the end grain of the spacer gets sealed in epoxy too!).


The mating surfaces are then slathered with slightly thickened epoxy and glued together.


The plans give dimensions for a tiller.  I went with my own design, cut out of 1" sapele, with big 1/@ roundovers.

The daggerboard is a simple trapezoidal shape, cut out from 3/4" plywood.  The lower corners are radiused, and, like the rudder, it gets shaped into a airfoil-like cross-section.


All of the rudder parts and the daggerboard get sealed with a few coats of unthickened epoxy, and are then sanded smooth.  Imagining the loads from doing dry capsize recoveries, I went the extra mile and put a layer of fiberglass on the daggerboard.


Per the plans, the daggerboard handle is a simple affair.  I made mine a little dressier, making it from padauk...


...routing a slot in it for the daggerboard to slip in...


...radiusing the upper edges, and routing in some grooves on the sides for finger grips.


Once coated in epoxy and sanded smooth, the handle is glued to the daggerboard.