Monday, May 2, 2011

Tall Ship

Aside from continuing fiberglass work on the new hull panels, I didn't make too much progress over the weekend.  I ran out of peelply, so I've reverted to the old three-coats-of-epoxy method.  It takes longer, but after a couple of boat, I've got to be pretty good at it.  There'll still be a bunch of sanding in my future as a result of it, but it is what it is.

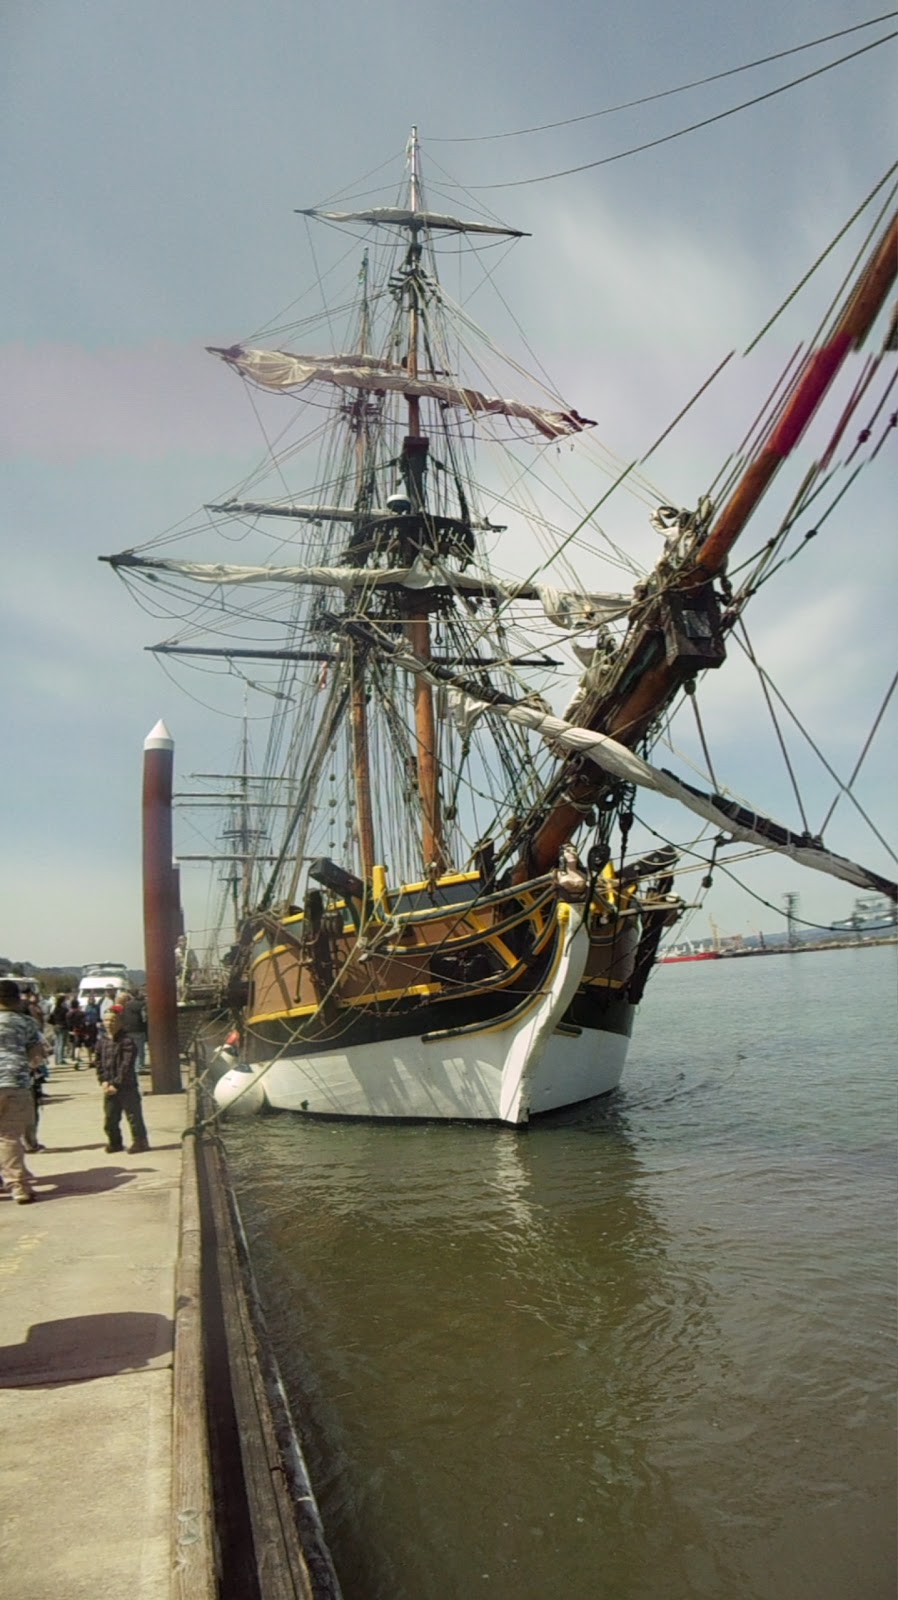
So, why didn't I make more progress over the weekend?  Because I was given a trip sailing aboard the Lady Washington for my birthday!  Actually sailing takes priority over boat building.  And sailing on a square rigger, well, enough said....


The Lady Washington brig-rigged replica of the smaller of Capt. Gray's vessels that he took on the first American expedition to the west coast.  She was built in 1989 in Aberdeen, WA, as part of Washington State's centennial celebrations.  Since then, she has roamed the waters of the west coast.  She has starred as the U.S.S. Enterprise in Star Trek: Generations, and as HMS Interceptor in the Pirates of the Caribbean films.  I visited her way back when she was under construction: shortly after her keel was laid, as I recall.  I been aboard several time since, but this was my first chance to sail aboard her.

The original sailed from Boston in the company of the Columbia Rediviva on a voyage of discovery to the west coast of North America in the late 1780's  Notable discoveries included the Columbia River and Grays Harbor.  From then, she served in the fur trade voyaged to China.  She foundered and was lost around 10 years after sailing from Boston.  She was originally rigged as a sloop, but was later re-rigged as a brig.  The replica was rigged as a brig, although, if I recall correctly, so was still sloop-rigged when she sailed with Columbia.

At one point, the dreamers that brought us the replica Lady Washington had also planned/imagined building a replica of the ship-rigged Columbia Rediviva, but this dream evaporated with the onset of financial realities.  These days, the Lady, sailing under the auspices of Grays Harbor Historical Seaport, sails the waters from California to Canada in the company of the square tops'l ketch, Hawaiian Chieftain.

Friday, April 29, 2011

Rework

After a few days spent moping and playing sad songs on the violin, I got back at it.  I picked up two new sheets of plywood.  I ripped them in half, stacked them up, and set to work.  After the last go at scarfing, I swore off using power tools to create scarfs.  So, I pulled out my assortment of hand planes and set to work.   I wish I had done it that way to begin with.  Long curls of wood materialized as I ran the plane along gradually receding edges of the plywood.   It just felt right...like an artisan practising his craft using the time-honored tools of the trade.   And the results were perfect.  Why didn't I do it this way to begin with?  Why did I think a power tool could beat a well handled plane?  Never again will I use a power tool to cut a scarf.

I made several passes with the jack plane and then finished it off  with my block plane.

OK, now here are some 8:1 scarfs to be proud of!

There are times that I think power tools and wooden boats were never meant to be brought into contact with one another. Except for random orbital sanders.

I glued my newly cut scarf joints together.  How'd they turn out?  Perfect.  These has turned out exactly the way that the first set should have.  So good, that I've contemplating redoing the other panels so that they too are of the highest quality. But aside from the desire to attain perfection, I can't really justify doing this.  I've inspected the other long panels are solid.  And they may be ugly, but all those surfaces will be painted.  The godfather of stitch 'n glue boatbuilding, Sam Devlin, says that you have to set realistic expectations or else "you will find yourself bogged down by an obsessive desire to have everything perfect."  So, I think I will leave well enough alone.  But still...

Continuing the re-work, I laid out and cut the new side panels, sanded them, and set about re-fiberglassing them.  With the keel and building cradle in the shop, I am a little short on space in the shop, so I only have room to fiberglass one panel at a time.  So, right now I have one done.  The other will get done in the near future. And then it'll be back to sanding.
Deja vu...Haven't I 'glassed panels just like this before?

Tuesday, April 19, 2011

DISASTER!

Not just a disaster.  A big disaster.  A big, unmitigated disaster.  I was just getting back into the groove, and then, bam! 

What happened?

Well, I have been doing what were to be the final preparations before starting to assemble the hull.  The bulk of the work has been sanding.  And sanding.  And sanding.  I started with sanding the bulkheads and floors. 


Sanding Bulkhead #1

I can only take about 2 hours of sanding at a time, so I changed things up and laid out, cut out, and assembled the building cradle. 


Assembling the building cradle

The completed cradle

Then I sanded some more, but having the completed cradle sitting in the shop was too much of a temptation.  So, I lugged the keel into position and dropped it into the cradle. 

At this point, you are probably wondering "what about the disaster?"  We'll get there, but first, a philosophical interlude.  I've done a little thinking about it (and a little research to back up my thinking), and I have concluded that, for Pocketship, the act of dropping the keel into the cradle officially constitutes laying the keel.  Quite a moment for pondering existential thoughts.  At one moment, there was nothing...just a collect of boat-related parts that I'd been working on.  Just hunks of wood, really.  But, by a simple act of bringing two of those parts together, like the moment of conception, something new was created.  In that moment, there was no physical change to hunks of wood that make up the keel assembly, yet it was transubtantiated; the essence of those hunks of wood were forever changed.  It won't float yet, but given time it will grow, change, take on a character all its own and eventually take to the seas.  As of April 10th, 2011, I officially have a boat in the shop.

The keel, in place, the boat, under construction.

This all was pretty exciting, and after trying to sand a few more minutes, I caved in, and dropped the starboard-side bilge panel into place, and started stitching it to the hull.  Stitching is a pretty simple process.  There are matching hole in the keelson and bilge panel.  Into each hole, a wire stitched (mentioned in the previous post) is inserted.   The panels get aligned and the loose ends of the stitch are twisted around each other, thus holding the parts together so that later, the seams can get glued together.  Stitch and glue. 


At this point, I really would have liked drop in the port side bilge panel and stitch it up too, but doing so wouldn't leave and room in the shop for sanding.  So, I resumed sanding.  As the week went on, I managed to get all the bulkheads and floors sanded.  This just left the side panels.  And these would only require light sanding thanks to my use of peel ply.  The hour was getting late, but I figured that I would at least set on of the side panels up on sawhorses before calling it quits for the day.  That's when the disaster struck. 

I laid hands on the middle of one of my side panels, hoisted it over my head, heard a snap, and felt my heart sink to my shoes as the scarf joint parted.   I really hadn't been happy with the quality of my scarf joints, in terms of appearence, but didn't really suspect any structural problems.  After all, I used a ton of thickened epoxy, which should be stronger than the surrounding wood.  What happened? 

On inspecting the scene of the crime, I found that a large percent of area the joint had plastic wrap in it.  I had used plastic wrap while the glue in the joint was drying to keep the squeeze-out from sticking to anything that it shouldn't. Apparently, in jiggering the pieces around to get them aligned, the plastic wrap had worked its way into the joint.  Epoxy doesn't stick to plastic wrap, so my scarf joint on that board had almost no strength.  It is a miracle (of sorts) that I didn't break sooner.

It is also a miracle that it broke when it did.  Had it held a few more days, it would have become a permanent part of the boat.  I can just imagine spending months and months building the boat, only to have it break in half when I roll it over to fiberglass the outside of the hull.


Busted!
I'm considering recovery options.  At this point, the only thing I can think to do is buy some more plywood, and start over on the side panels.  This time, I'll cut the scarfs the right way, with a hand plane.  I also need to inspect the other long hull panels and see it they have to be redone too!

In the meantime, I'm going to spend a few days moping.

Thursday, April 7, 2011

Poking along

Progress is still slow in the world of boat building.  I've been putting along, trying to get the point where I can start stitching the hull together.

Since last post, the sailing hardware package arrived.  Well almost.  The box containing the sail track is still on a walkabout across the country.  Apparently, there had been a little confusion on this order, but thanks to Ed and the other guys at CLC, it all got straightened out.  Thanks guys.


All the blocks, rigging, padeyes, and doodads a guy could ever want.

In an attempt to get into the groove, I decided to tackle something mindless and easy....preparing the stitches.  I bought 150' of steel wire and started cutting this into 3-4" lengths.  For the most part, would then bend them into something resembling large staples.  The staple shape makes stitching things together much easier and minimizes the amount of fighting you have to do with the stitches. 

Measure and cut a length of wire.

Bend it into a staple.  I've found that using a DVD case as a mould makes the perfect staple.

The finished product.

A whole bunch of the finished product.
 I've also been coating the bulkheads and floors in epoxy.  The last coat is drying even now.  The next step will be to sand, sand, sand.  I'm not really looking forward to that, but it has to be done before the hull can be assembled. 

Floors and bulkheads waiting for epoxy.

Roll on the goo.

Two coats on each side is all it takes!

Now for the really exciting part.  Over the course of the last two kayaks, I constantly struggled with keeping the shop clean as I work.  Boat building generates a lot of used gloves, paper towels, mixing cups, stir sticks, brushes, odds, ends, fiddle and faddle.  There are many times when you are working to fast to keep ahead of epoxy that's about to kick, and in your haste to not ruin your project, a lot of that flotsam ends up on the floor of the shop.  I've tried cleaning up after each session, keeping garbage bags handy, hanging bags from the wall, on, and on, and nothing really seemed to work.  Bags were too small, too hard to open, not conducive to easily putting rubbish into, and so stuff still ended up on the floor.    To illustrate the insanity...
It is a rudder, and a waste bin!

Friday, March 25, 2011

In the Doldrums

I finished my Pygmy Osprey Double and got her out on the water last weekend.


Need I say more?

On the PocketShip front, work has been slow.  I'd like to say it was because I've been busy finishing, and using, the kayak.  But really,  I have to admit that I'm in one of those boatbuilding lulls.  I am still looking forward to stitching the hull together, but am not overly motivated to work on the steps I have to work on before I can do that. 

Lack of motivation and/or the feeling that you aren't making progress happens at various times when building boats.  For me, this condition usually arises when I look ahead at my near-term tasks and see a long list of items that take time and don't really make a visible contribution to the completion of the project.  Like fiberglassing bulkheads and coamings on a kayak...yuck.  I just want to skip and and get to the good part.  Since last post, my list has had things like straightening the keel (rework...yuck), fiberglassing the side panels, laying out and building the building cradle, coating bulkheads in epoxy, sanding, cleaning the shop, etc.

One thing I've been doing to motivate myself is reading people's boatbuilding blogs.  Having memorised tall of the PocketShip blogs out there, I've moved on to people building Devlin boats.  A coworker mentioned Devlin boats a couple of weeks back, and since them I've been cruising Devlin's website looking at his designs.  I had heard of Devlin before, but didn't realize that he's from my home town.  I went to middle school with a Devlin...I wonder if there's a relation. 

Devlin has a design, Nancy's China, that is very much in the same class as PocketShip.  The boats have similar design briefs and nearly identical dimensions.  I saw two Nancy's Chinas moored new the PocketShip prototype at the Wooden Boat Festival in Port Townsend last year.  Both Nancy's China and PocketShip have sharp lookin' "retro" vibes.  Like the current Dodge Challenger and Ford Mustang, respectively, NC is more straight retro, while PocketShip is a modern take of the classic...both look great.  If I had it to do or again, I would choose PocketShip again, but only after much contemplation.  A builder would rightly be proud of either. 

I'm going to have to stop looking at the Devlin stuff because I'm getting ideas about future building projects (19' Winter Wren, 26' Kestrel, 28' Means of Grace...a lifetime of boats to build), all of which would be easily tacklable with the skills I'm picking up on PocketShip.  Stop, stop, stop.  One project at a time. 

What does all this have to do with the boat-building blues?  First off, reading accounts of boat building adventures is fun and allows a person to experience (vicariously) the highs and lows of building boat in a concentrated form.  That gives motivation.  Also, there was a bit of wisdom I picked up on one of those blogs.  That builder had hit a lull and passed on the advice that he was given...keep at it.  Get out there and do something.  No matter how small, it'll erode how many menial tasks you have left.  And you keep some momentum.  If you stop entirely and hope, then it gets harder and harder as a function to time to get started again.  And eventually, you'll hit something fun and get you mojo back.

With that advice, I've been nibbling away at the projects in front of me.

When I posted about my crooked keel issue, I received an email that really cut to the root cause of the problem.   Quoth Malcolm, "[a]ccording to a great boat builder at Eton College, Frank Claret, before the keel is laid, the builder should go out and get drunk. All skiffs have their keel and first planks either side fitted with the craftsman, (singular note), in a state of alcoholic stupor!"  If only I had known this beforehand.

Now that I knew what went wrong with my keel, I had to figure out how to fix it.  My original plan was to cut away the blocking from the keel sides longitudinally.  I made it so far as getting the saw out before deciding that this was a somewhat unpalatable option.  Making the cuts well and then reassembling the keel in something like the right shape would be trickier in practice than in theory.  After a little more head scratching, I decided to amputate the whole aft compartment of the keel by cutting athwarthships, down the middle of the blocking that separated the aft lead-filled compartment from aft hollow compartment.  I'd then sand one of the pieces to correct the angle of the aft keel and stick the whole thing back together.  So, that's what I did.

Sawing a chunk off the keel was a little, umm...fun?  Not really something I ever would want to do voluntarily.  The iterative sanding and test fitting with the keelson on to get the right angle went quickly enough.  And then a bit of goop and some crazy clamping, plus a couple of bronze screws and it was done.  Imagine my relief after the glue dried and a test fit of the keelson showed that my repair worked.  I still plan to reinforce the seam with with some fiberglass tape (just to be safe), but in the meantime I have declared mission accomplished.

No going back...I just sawed off the aft most 2' of my keel!

With this done, I was able to fit the aft keel cap over the lead compartment and the hollow compartment.  This seals of those areas forever (hopefully) and also provides a large gluing/screwing surface for the keelson to attach to.


Fitting the aft keel cap
A couple of days later, I got the insides of the side panels fiberglassed. Just like the topside panels, this get a layer of 'glass on the inner faces of the panels prior to assembling the boat.  The outer face gets 'glassed with the rest of the outside of the hull much, much, much later in the build.

Again, I used peelply when the epoxy was curing  to try to reduce the amount of sanding required later on.  I've been working on the technique for getting all the wrinkles out of the peel ply after I lay it down (wrinkles cause epoxy ridges).  By the time I did the final panel, I think had a method that worked.  There won't be many more opportunities to use my newfound peelply ninja skills on this project, though.  :-(

'Glassing the side panels.
  
Turning my attention back to the keel assembly, I slathered on a bunch of thickened epoxy and glued the keelson on.  Just a touch of cleanup work and the keel assembly will be ready to go.
The keel slathered with epoxy

This is a lousy picture, but basically what you are looking at is the keel assembly, with the keelson glued on, screwed down and a bunch of weights on top to double, triple, and quadruple check that there is good clamping pressure while the glue dries.


In other news, I had ordered the PocketShip sailing hardware package from CLC back in early February.  This contains all the blocks, fairleads, cleats, and other gear to rig PocketShip.  All the stuff I won't need for many, many moons.  It was backorderd for a while and finally shipped this week.  Since then, it has been on an adventure.  Here's a brief history of the shipping status:

March 21 - Package shipped
March 22 - Shipper requested intercept.  Return to sender.
March 22 - Reshipped
March 24 - Delayed due to train derailment
March 24 - Also delayed due to late train
March 25 - Shipper again requested intercept, return to sender
March 25 - Also delayed due to late train

I'm glad I don't need anything in this package anytime soon!
So, I keep plugging away.  I still have a list of tasks that I don't want to do before I can stitch the hull together, but the list is growing shorter.  I know I'm making progress, since I just finished off my first gallon of epoxy resin.  Only nine more to go...or at least until I have to buy more. ;-)

Friday, March 11, 2011

It's Starting to Look Like a Boat

A boat in the shop!

Wait a minute, wasn't this supposed to be a sailboat? 

Back in November, I mentioned that the weather had become too cold to continue varnishing my nearly-complete Pygmy Osprey Double kayak.  Well. the weather stayed cold, I hung my kayak from the ceiling, I started working on PocketShip, and the kayak remained one coat of varnish away from completion.  This week, though, this finally warmed up enough that the PocketShip parts got swept aside, the kayak returned to ground-level, and that last coat of varnish was spread.  Thus, the few hours that I've had to work on boats this week has been dedicated to fitting out and finishing this kayak.

Thursday, March 3, 2011

Help Me, Obi Wan Kenobi

There is a scene in Star Wars - Episode III, where Obi Wan Kenobi and Anakin Skywalker are running down a corridor on a bad-guy ship, when the suddenly get captured.  Obi Wan turns to Anakin and says, "Wait a minute. How did this happen? We're smarter than this."  That's how I've felt this week.

Back when I dry fit the keelson, I had to do a little bit of jiggering to get things lined up at the trailing edge of the keel.  At the time, I wasn't too worried about it, but the more I've thought about it, the more I've come to accept that the keel is not perfectly symmetric.  Other Pocketship builders have reported having similar difficulties, and I tried to learn from their mistakes.  But my precautions weren't enough.  It is apparently just really difficult to glue of the keel of this boat and get it to come out straight.  So, I'm going to have some fixing to do.

This probably wouldn't bother me too much, if keelson totally covered the trailing edge of the keel, but alas, it does not.  My plan right now is to cut right down the centerline of the keel blocking up to the vertical blocking at the aft end of the lead compartment.  I'll then try to force the aft end of the keel to where I think it should be, and then slather everything with thickened epoxy (the cure-all!) and stick it all back together.  Of course, I had to figure this all out after pouring 85lbs of lead into the keel.

That reminds me, I did get a chance to pour a little more lead into the keel.  I reckon I'm up to 85lbs total.  This may be the most drawn out lead pour in Pocketship history (not that it has a long history).

Here's the problem...the keelson and the keel just don't line up.

On a different "fixing my mistakes" topic, the filling of my ugly scarf joints is almost complete.  Filling the ugly bits and sanding them seems to work well and make the surface nice and smooth.  I'm planning on painting all of these surfaces, so fortunately the key is smoothness, not beauty.  So, success!  Yet, as I was sanding thickened epoxy this week, I couldn't help but continue to kick myself for these ugly joints.   How did this happen?  I'm smarter than this. 

The (re)filled joints 

The sanded, filled joints.  Turned out ok.

Next up then, was to get some fiberglassing done.  The inside faces of both the lower side panels and the topsides panels get a layer of 'glass before assembling the hull (the outside faces get it much later in the build).  It is still a little too cold out in the shop to this kind of fiberglass work...I don't have enough worklights to heat the whole surface, and I'd rather do this with slow hardener than the fast stuff.  So, I spread out a couple of large sheets of cardboard  inside the house and set up to fiberglass the topsides panels there.  In retrospect, I probably wouldn't (won't) do this again.  Too much hassle, too much worry about ruining something inside the house.   Temperatures should be warming up soon, and I'll just have to cope until then.

At any rate, I spread the 'glass, the epoxy, and a layer of peelply out on the topsides panels.  Done right, the  peelply gives a nice, smooth surface in the end...no sanding.  In reality, it is very difficult to lay the stuff down on top of wet epoxy without getting wrinkles in it.  Those wrinkles lead to little ridges of epoxy...not nice. If you work hard, you can work out a lot of the wrinkles, but I have yet to perfect a method to get them all out, or even get most of them out easily.  Still, the vast majority of the surface ends up smooth, and hours of sanding are erased from the agenda, so it is worth it.

Spreading the 'glass

The glass cloth is trimmed back and we're ready for epoxy.

It is a little hard to see, but here both  panels are wet out and the peelply has been laid out.


At least I can still fiberglass compently.  So, next up will be some keel straightening and  bit of fiberglass on the lower side panels.